
Natural Egg Dye
Natural Egg Dye
Before the existence of craft stores in the 18th century, cottage homemakers had to create handmade decor displays. Many of those displays set up the makings of traditional seasonal decorations we put out today.
The 18th-century garden would have been filled with seasonal flowers, vegetables, and any other farm-life items of the day. Many of those items could serve the dual function of decoring while creating practical storage.
Eggs are a consistent item on the small cottage farm. The return of Spring also means an influx in the production of eggs. So you have the right combination for decorative food storage!
History of the Easter egg:
It is probably not a surprise that the Easter egg originates from religious practices. Dating back to the medieval period, when it was forbidden to eat eggs during Lent, so on Easter Sunday, receiving or getting an egg was a real treat!
This Easter morning treat was especially exciting for the poorer people of the time, who usually couldn't afford meat and would substitute it with eggs. Eggs also carried folklore around with them during Good Friday and Easter Sunday.
If you kept your eggs laid on Good Friday for one hundred years, they would turn into diamonds. Eggs that produced two yolks were a sign that you would soon become wealthy. Cooking your eggs on Good Friday and eating them on Easter Sunday would help with fertility and prevent sudden death.

People of the 18th Century decided to have a little fun with their eggs. They would hard boil, decorate, and then roll them on the ground in an egg roll race. At this time, it had become a practice for children to roll eggs decorated with colors. There is documentation that in 1290 King Edward I had eggs decorated with colors and gold-leaf given as gifts to his family members.
Step 1: Creating Natural Egg Dyes
The Cottage garden would have been filled with vegetables perfect for natural egg dyes! Most homemakers would have already been familiar with the natural dyes they used to create colors in their natural fiber fabrics. So, it made sense to use those dyes on their eggs.
We are also growing many of the vegetables used in creating natural dye colors in our cottage garden. But, ours will not be ready for harvest by Easter, so we selected some from our local market!

When purchasing your vegetables, buy medium size veggies; you will need 1-3 cups for some dyes depending on the desired color. It will also give you some wiggle room for any mistakes.
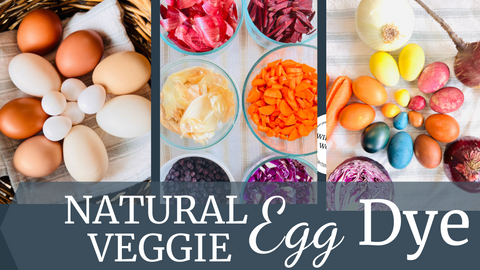
Natural Dye Colors:
- Purple Cabbage: Green on brown eggs & blue on white eggs
- Red Onions: Lavender to red on white eggs, not recommended for brown eggs.
- Yellow Onions: Orange on white eggs & rusty red on brown eggs
- Spinach: Green on white eggs and darker green on brown eggs
- Carrots: yellow on white eggs, not recommended for brown eggs
- Blueberries: purple to blue on white and brown eggs
- Turmeric: yellow on white eggs, not recommended for brown eggs
- Beets: pink on white eggs and maroon on brown eggs
Ingredients:
- Purple Cabbage
- Red Onions
- Yellow Onions
- Carrots
- Blueberries
- Beets
- Turmeric
- Distilled Vinegar- You must use vinegar, or the process will not work.
- Water - I used water from my Berkey Water Filter

Tools:
- Pots for boiling eggs and vegetables for dye. You will want more than one pot to do more than one color at a time.

- 6 jars for holding cooled dye and the actual dying process. You will dye your eggs in the cool temperature dye, so you will want jars on hand to keep dye while you are waiting and creating other colors.
- I use Mason Jars and have plenty on hand because they are so versatile.

- Strainer and possibly a funnel for getting dye into jars.
- Extra bowl to hold dye while separating it from the veggie material, preferably with a pout and handle, so your dye can easily be poured into the glass jars.

- Paper towel or an old cloth you don't mind getting dye on
- Tongs to grab your eggs out of the dye
You will want to gather all your ingredients and tools together to have them on hand when needed.
Tips Before Starting:
- This project is not a quick dying process. It takes two days or one afternoon/night. Eggs will not be ready until the next morning.
- Adults or older children need to cut up the vegetables.
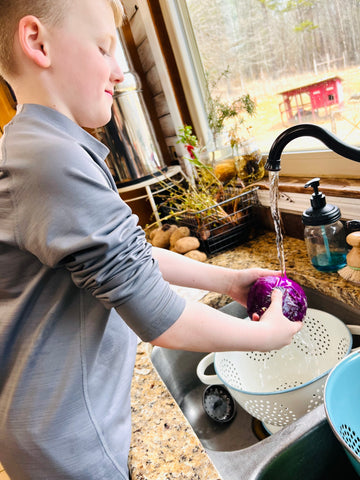
- Younger children can wash vegetables, peel onion skins, crush blueberries, and help boil eggs.
- Help younger children or only adults who need to pour the natural ingredients into boiling water. Also, adults need to pull boiled eggs out of the pots.
- Because the boiling of material takes 30min., children have short attention spans. I suggest letting the children pick the material they want to do first. We did two boiling sessions with three pots and three materials each time. The children chose carrots, cabbage, and beets, so those were first, and then we did the other colors.
- Label jars using painters tape. Some of the darker colors look the same in the jars.
Step 2: Boil Your Eggs First
You will want to boil your eggs first before doing anything else. A cool boiled egg is key. You also do not want to use a fresh, laid that-day egg. Use a 2-3 days-old egg kept at a cool room temperature or in the refrigerator.

Here are the eggs we will die and the boiling times for each.
- Chicken Eggs: 8 min
- Duck Eggs: 10-15 min
- Quail Eggs: 6 min
Wash your eggs and then boil them to the temperatures listed above.


Step 3: Wash Your Veggies


Step 4: Making the Dyes
I will break down the dying process by color to make it easier to follow. Don't worry. I will give you an easy-to-follow guide at the end of the post! We will start with my favorite color.
Blues & Purples
Purple Cabbage: Blue on White, Dark Blue Green on Brown
- Chop up 1-3 cups of purple cabbage, depending on how many eggs and how deep of a color you want. Set aside.

- Take 2 cups of water, pour it into your sauce pot, add 2 tablespoons of vinegar, and bring to a boil.

- Add cabbage to the boiling water, lower the heat, and let simmer for 30min.

- Let cool completely.
- Take the strainer, and place it above or inside a bowl. Then pour the contents of the pot into the strainer, filtering and separating the dye and veggie material.

- Now pour the dye into your jar and let cool.
- Set Jar in the refrigerator if you are not dying your eggs immediately.
Blueberries: Purple, Silver, & Blue
- Crush 1 cup of blueberries. Set aside.

- Take 2 cups of water, pour it into your sauce pot, add 2 tablespoons of vinegar, and bring to a boil. *I wish I had poured 3 tablespoons of vinegar.
- Add Blueberries to the boiling water, lower the heat, and let simmer for 30min.
- Let cool completely.
- Take the strainer, and place it above or inside a bowl. Then pour the contents of the pot into the strainer, filtering and separating the dye and veggie material.

- Now pour the dye into your jar.

- Set Jar in the refrigerator if you are not dying your eggs immediately.
Lavender/Pink/Red:
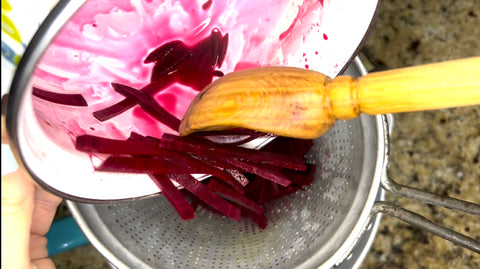
Beets: Pink on White Eggs & Marron on Brown Eggs
- Shred up 1-3 cups of beets, depending on how many eggs and how deep of a color you want. Set aside.

- Take 2 cups of water, pour it into your sauce pot, add 2 tablespoons of vinegar, and bring to a boil.
- Add beets to the boiling water, lower the heat, and let simmer for 30min.

- Let cool completely.
- Take the strainer, and place it above or inside a bowl. Then pour the contents of the pot into the strainer, filtering and separating the dye and veggie material.
- Now pour the dye into your jar.

- Set Jar in the refrigerator if you are not dying your eggs immediately.
Red Onion Skins: Lavender to Red on White Eggs
- 1-3 cups of Onion Skins, depending on how many eggs and how deep of a color you want. Set aside.

- Take 2 cups of water, pour it into your sauce pot, add 2 tablespoons of vinegar, and bring to a boil.
- Add onion skins to the boiling water, lower the heat, and let simmer for 30min.
- Let cool completely.
- Take the strainer, and place it above or inside a bowl. Then pour the contents of the pot into the strainer, filtering and separating the dye and veggie material.

- Now pour the dye into your jar.

- Set Jar in the refrigerator if you are not dying your eggs immediately.
*Our eggs ended up being more brown. Next time I will add 4 cups of skins to see if that adjust the color.
Yellow & Orange:
Yellow Onion Skins: Orange on White Eggs & Red on Brown Eggs
- 1-3 cups of Onion Skins, depending on how many eggs and how deep of a color you want. Set aside.
- Take 2 cups of water, pour it into your sauce pot, add 2 tablespoons of vinegar, and bring to a boil.

- Add onion skins to the boiling water, lower the heat, and let simmer for 30min.
- Let cool completely.
- Take the strainer, and place it above or inside a bowl. Then pour the contents of the pot into the strainer, filtering and separating the dye and veggie material.


- Now pour the dye into your jar.

- Set Jar in the refrigerator if you are not dying your eggs immediately.
Carrot & Turmeric: Light to dark Yellow on white eggs
- 1-3 cups of chopped carrots, depending on how many eggs and how deep of a color you want. Set aside.

- Add 2 tbsp of Trumic to your water if you want a darker yellow color.
- Take 2 cups of water, pour it into your sauce pot, add 2 tablespoons of vinegar, and bring to a boil. *Next time I will add 3 tablespoons of vinegar.
- Add carrots to the boiling water, lower the heat, and let simmer for 30min.

- Let cool completely.
- Take the strainer, and place it above or inside a bowl. Then pour the contents of the pot into the strainer, filtering and separating the dye and veggie material.
- Now pour the dye into your jar.
- Set Jar in the refrigerator if you are not dying your eggs immediately.
Step 5: Dying Your Eggs
Now that all your dyes are ready, it's time to dye eggs!
- You want the boiled eggs and natural dye to be cool during dyeing.
- Stick them in the refrigerator to cool if needed.

- The longer your eggs stay in the dye, the deep color they will be.
- Carefully place your eggs in the jar making sure you don't allow the dye to overflow.


- Place the jars in the refrigerator overnight or at least 6-8 hrs.

- You can dip your eggs, let them dry, then dip them and repeat the dipping drying process until you reach the desired color.
- Carefully remove the eggs from the dye with tongs, large spoon, or a large egg dye dipper. Adults will need to do this step.


- Place them on a cookie cooling rack or I used a tray from my dehydrator to dry them.

End Results:
I did notice that the duck eggs did repel some of the dyes creating a cool speckled effect. As mentioned in the carrot and blueberry instructions, I would add more vinegar to those to for a deeper color.


You can watch us create our naturally dyed eggs on our YouTube Channel!
Link HERE or watch the video below!
Thank you for visiting the Wildwood Wonder Cottage Homestead!