
Using Oranges & Herbs in Warm Winter Crafting
Using Oranges & Herbs in Warm Winter Crafting
Embracing the Clam & Warmth with Winter Crafting:
As we settle into the coldest months of the year, we usually find ourselves mostly indoors.As we settle into the coldest months of the year, we usually find ourselves mostly indoors. With shorter, colder days, I long for the days I can spend outside. One way I shift my desire to work out in the gardens is to focus on crafts that can bring nature inside.

Why is Crafting Important for the Cottage Homestead?
Everyone knows that nature hibernates in the winter, but for some reason, humans in the 21st century rush through the seasons as if they are all the same. Different civilizations have associated spring with rebirth, summer with energy and growth, fall with abundant life, and winter with nature's way of resting and rejuvenation.
Since humans are not a species that will sleep for weeks and months on end, we have used the time of resting and rejuvenation to do the small but essential crafting and homemaking. Usually, these crafting, sewing, and homemaking tasks are enjoyable processes. One can take their time creating, and the level of craftsmanship depends on the desired result, which can also be therapeutic.
Using What You Already Have:
What I like about the crafts I'm sharing today is that they use the extras or leftovers of what I've already processed, grown, saved, or created on our modern cottage homestead. This helps us meet our goal of regenerative gardening and the permaculture mindset we strive for.
Crafting With Oranges:
We usually have oranges around, and during the winter season, I like to make apple cider, adding orange slices and cranberries. I also use the cranberries and orange slices in my stovetop potpourri to fill the house with an all-natural warming scent. Orange slices are also perfect for wax sachets and dried for a winter garland. So, having a couple of oranges available will help with the following three winter crafts.
Dried Orange & Okra Garland
This project is simple, smells good, and just plain satisfying!
When you read okra, you were probably surprised. Every year, I end up with over-sided okra or extra pieces that are not enough to cook with. I started by drying the okra for seeds and loved how it looked.
Dried okra has become an accent piece in my home. This year, I ended up with more okra than usual, and as I thought about what I could do with them, I kept seeing them as ice sickles. What a fantastic way to store my seeds over winter! Okra can be optional, and the garland will work just fine with only orange slides, but it has become a part of my winter garland.

Materials:
Oranges- with peel on, cut crosswise into 1/8 -1/2-inch pieces.
Twine/String- I prefer hemp string because of its natural coloring.
Needle- the eye of the needle needs to be wide enough for the twine.
Wooden Beads - make sure the opening is big enough for your string and needle.
Oven or Dehydrator
Optional- Okra- Dried for about two weeks with white paint.

Directions for drying Oranges:
- Cut your oranges crosswise into 1/8 - 1/2-inch pieces.
- Using the Oven method: Preheat your oven to 200º F
- Lay them in a single layer on a cooking sheet lined with parchment paper.
- Bake for about 3 hours; the orange peels should dry, and the flesh (inside) is translucent.
- Depending on your oven, you may want to roate your cooking sheet or flip your oranges to ensure they dry evenly.
- Remove them from the oven and let them cool completely before moving.
- DO NOT do the oven method with the okra.
Dehydrator Method:
Using a food dehydrator is an easy way to dry oranges and okra. The okra may take longer to dry than the oranges. Follow the recommendations in your dehydrator's manual for drying settings and time.

Drying & Painting Okra:
- As mentioned above, you can dry the okra pods in a food dehydrator, cookie drying rack, or DIY drying tray.
- Once the okra is completely dry, you can use it with the original color or paint the outside white with craft paint to give it a wintery feel.
- If painting, you will want to paint one side, lay it on wax or parchment paper, let it dry, and then paint the other side of the okra.


- If you would like a more worn/older look, use sand paper on the edge.

Making Your Winter Garland:
You will want to cut the desired length of twine, considering how much you will need on the ends for hanging. Thread your string in the needle; you will need the needle to push the cord through the okra pods.

Stringing Pattern Steps:
- Make a knot to secure your bead & orange slice on the twine.

- Knot, bead, orange slice, bead, knot (skip some space)
-

- Knot, bead, okra, bead, knot (skip some space)

- Repeat this pattern until your garland is as full and long as you want.
- If you have extra orange pieces left, use them in our next craft, Herbal Wax Sachets.
Your dried garland is now complete!
They are beautiful in windows; hang them anywhere you'd like to create some winter warmth.

Making Herbal Wax Sachets:
With their visually pleasing shapes, colors, and textures, Sachets can bring warmth to the home. They also work well aromatically, slowly releasing natural fragrances. Sachets work best in enclosed spaces like closets, half baths, and cabinets.
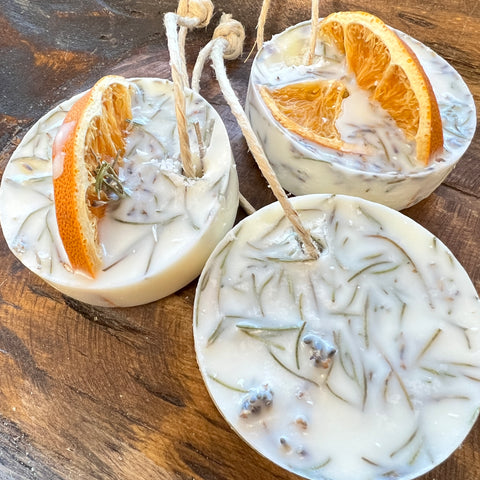
Because soy wax, bee's wax, and herbs are readily available while creating our Wildwood Wonder Natural Body Care, herbal wax sachets are an excellent way to use the leftover extra bits I sometimes have. So, this makes a beautiful zero-waste gift for me to bless others with. You do a larger batch and have them ready as a little happy for your friends and family.
How to Make:
Depending on your silicone mold, the following recipe can make 4-8 wax sachets. You can place the sachets in a decorative dish or a linen drawstring bag, or by poking a hole in your sachet; you can run some twine through it and hang it up.
Materials:
- Silicone molds
- Candle melting pitcher, double boiler, or small pott
- 1/2 lb soy wax pellets or bee wax pellets
- 2-4 dried orange slices; you can also cut them into halves and fourths.
- Dried Rosemary sprigs (learn how to grow on your own)
- Dried Lavender
- Any dried flowers work well as a visual touch
- 1/2 tsp sweet orange essential oil
- 1/2tsp rosemary essential oil
- Twine and straw/skewer if you are wanting to hang them

How to Make:
- The first step is to melt your wax pellets safely. There are "fancy" ways to do this, and if you have made candles or salves before, you may have some of those tools, but if not, I have a simple way as well.
- "Fancy"- if you have a candle-melting pitcher, you can melt the wax like you would when making candles, so this is likely an easy process for you. Place the candle-melting pitcher inside a large saucepan filled with two inches of water. (You can also use a double boiler method, following the exact directions as the candle-melting pitcher. If you want the simple way, you can utilize a small pot, but you have to keep an eye on it the entire time and stirring so that the wax doesn't burn)
- Once the wax is melted, remove the pitcher from the stovetop immediately so that the wax does not become too hot. Use a candle thermometer inside the pitcher or a candy thermometer will do. Before adding your favorite essential oils, the wax must be cooled to around 120-125º F. Stir constantly for 1-2 minutes to ensure the scent is mixed well.
- Now, you can pour the scented wax into your silicone molds. After the molds are filled, add your orange pieces, rosemary, and any other herbs or flowers you like!

- The trick to keeping your sachets from breaking is to let them cool for several hours before removing them from their molds.
- If you want to string your sachets like I did, you will want to make your holes before they harden, so create them while the wax is still soft. You can use a metal straw or skewer.

See how I made my Orange & Okra garland in my Instagram Reel below!
Happy crafting, and enjoy!